Skip to content
  • Recipes
  • Blog
  • About Us

Pumpkin Whoopie Pies with the neat egg

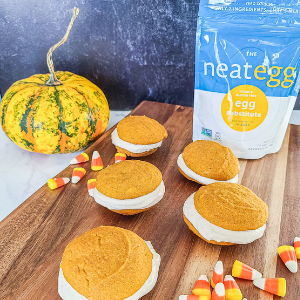
What’s a whoopie pie, you ask?!  This sweet treat is of Pennsylvania Dutch origin, and the story goes that anyone who eats this cream-filled, cake-like, sandwich can’t help but proclaim, “Whoopie!”  You’ll hear extra praise for this plant-based and gluten-free pumpkin version which makes the perfect fall dessert made with the neat egg.

Makes 12 Whoopie Pies

Shop neat

Ingredients

Filling

  • ¾ cup raw, unsalted cashews, soak in water for 4 hours
  • ½ cup coconut cream (the solid part from a refrigerated can of coconut milk)
  • 1 tablespoon maple syrup
  • 1 tablespoon coconut oil, melted
  • ½ teaspoon cinnamon
  • Pinch of salt


Cakes

  • 2 ¼ cup  *King Arthur Gluten-Free Flour
  • ½ cup coconut sugar  *Bob’s Red Mill
  • 1 teaspoon baking soda
  • ½ teaspoon baking powder
  • 1 teaspoon cinnamon
  • 1 teaspoon pumpkin pie spice
  • Pinch of salt
  • 1 neat egg, prepared according to package instructions
  • 1 tablespoon apple cider vinegar  *Bragg
  • 1 teaspoon vanilla extract
  • ¾ cup plant-based milk
  • 1 cup canned pumpkin puree
  • ¼ cup cooking oil of choice

Directions

  1. First, prepare the filling, as it needs to refrigerate for about 4 hours.
  2. Drain and rinse the cashews.
  3. In a high-speed blender, blend together the cashews with all the other filling ingredients.
  4. Blend until completely smooth, about 2 minutes.  Refrigerate for 4 hours or until thickened.
  5. Preheat the oven to 350 degrees.  Line a baking sheet with parchment paper.
  6. In a mixing bowl, combine the dry ingredients: flour, sugar, baking soda, baking powder, spices, and salt.
  7. In the bowl of a stand mixer, add the neat egg, vinegar, vanilla, milk, pumpkin, and oil and mix until thoroughly combined.  Gradually add the dry mixture and continue to mix until incorporated.
  8. Spoon 1 ½ tablespoons of the batter onto the parchment lined baking sheet.  Leave about 1 ½ inches between each cake on the sheet.
  9. Continue to fill the sheet.  Bake for 12-14 minutes or until the tops no longer look moist and shiny.
  10. Let cool completely before assembling with the filling.
  11. Assemble the whoopie pies by adding 1 tablespoon of filling to half of the cakes, add the filling to the flat side of the cake.
  12. Top with the other cakes, flat side towards the filling, making sandwiches.
  13. Serve immediately or wrap each cake individually in plastic wrap and store them in the refrigerator for serving at a later time.  Whoopie!

Share This Recipe

Print Recipe

You Might Also Enjoy

Caffeine-Free Coffee-Flavored Donuts

Eggless Waffles with the neat egg

Featured Recipes

Vegan Pear and Almond Tart Recipe

Egg-Free Donut Recipe

Hazelnut Cake Recipe

Recipes by Brand

  • Loma Linda
  • neat
  • Kaffree Roma

Recipes by Occasion

  • Breakfast
  • Lunch
  • Dinner
  • Snacks
  • Baking
  • Salads
  • Appetizers
  • Beverages
  • Desserts
  • Gluten-Free
  • Vegan
  • Vegetarian

A cupboard full of ideas and recipes to inspire your plant-based diet.

Submit a Recipe

🇺🇸 Vist U.S. Site

🇬🇧 Visit UK Site

Sign Up for Our Newsletter

Get new recipe inspiration delivered right to your inbox.

Privacy Policy